Tuesday 10 November 2015

Installing Fedora in Virtualbox VM


This post assumes people already know creating a VM in virtualbox.

After creating the VM for installing Fedora, mount the ISO file as a CD drive or put the CD for Fedora in the host OS and attach the CD drive to guest OS.

Boot the VM through its CD Drive (which is either the ISO file mounted or the attached CD drive of the host). You will see a screen as below. You can either wait to start the Fedora Live, or you can just press the enter key to proceed quickly.

1

As the below screen shows the Fedora Live CD will be started.

2

After completing the startup it will show you two options to proceed further, as shown in the below screen. Either you can install Fedora on an HD or you can just use the live CD to get a feel of fedora. Here we will choose the option “Install to Hard Drive”

3

As shown below, it will ask you for the UI Language. The first language selected will be “Hindi”. If you want to change it select the desired language. The first box from left shows the language and upon selecting the second one will show the variants of the language.

4


We have changed the language to English India. Please see the screen below. After that click on “Continue” button at the bottom.

5

This is the next screen (second screen) of the Installation Wizard.  Here you can modify “Keyboard”, “Time & Date”, “Installation Destination” and “Network & Hostname”

Just click on the desired item. It will take you to the configuration screen for the respective item. The items that are shown with and exclamation in triangle icon should be configured to proceed further.

6

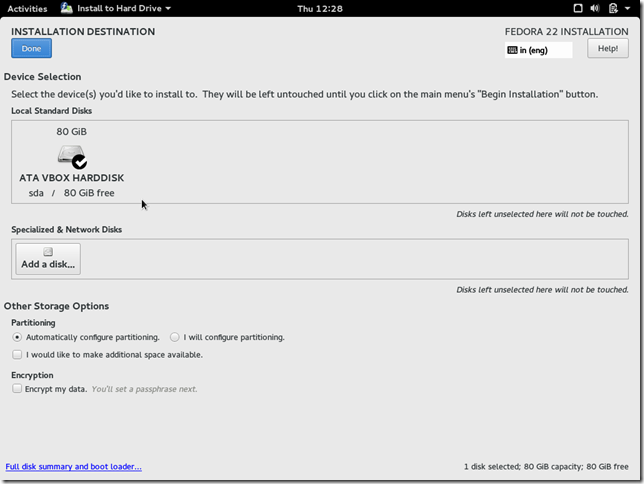
Let us configure the disk partition. Clicking on the “Installation Destination” item in the above screen will take you  to partition configuration screen, as shown below. Since there ism only one disk it is selected by default. Also  the “Partitioning” is Automatic selected by default. Here we will proceed with the default values. After selecting the desired values click on “Done”

8

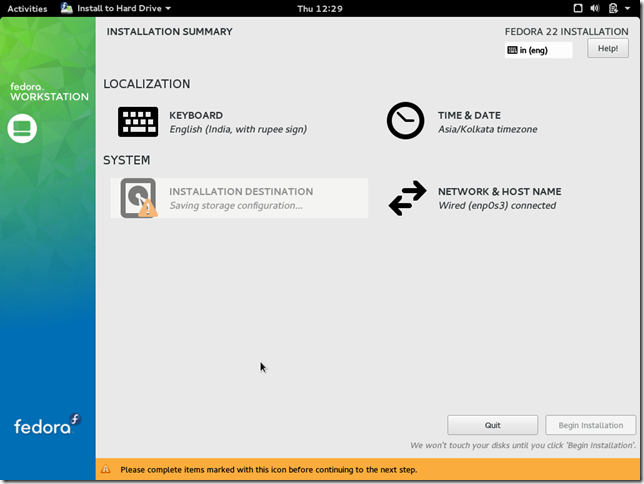
After clicking “Done” on the above screen you will be taken back to the screen as shown below. When it completes the saving of storage configuration the “Begin Installation” button will get enable. The system will start the partitioning only after you click the “Begin Installation” button.

9


As shown in the screen below, now “Begin Installation” button is active. Click on that button to start the installation process.

10


When you click the “Begin Installation” button as specified earlier the installation process will start. Now you have to set the root password and create one user which will belong to the “sudoers” group.

11


Clicking on the “Root Password” in the above screen will take you to the screen below. Set the password here and click on “Done” button. This will take you back to the above screen.

12

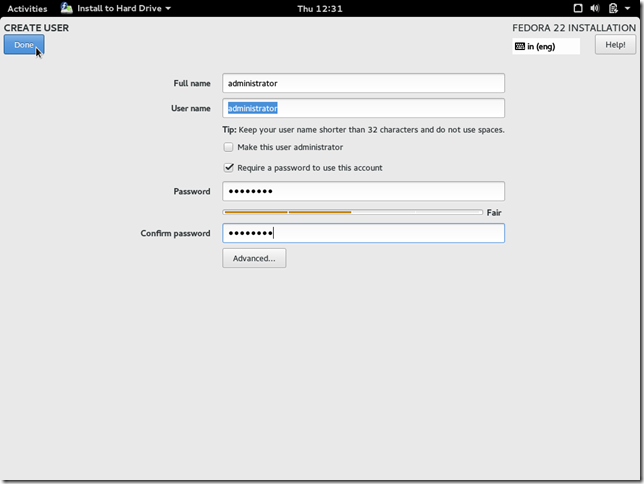
Clicking  on the “User Creation” button in the “Configuration” screen will take you to the screen below. Fill the fields and click on “Done” button.

15


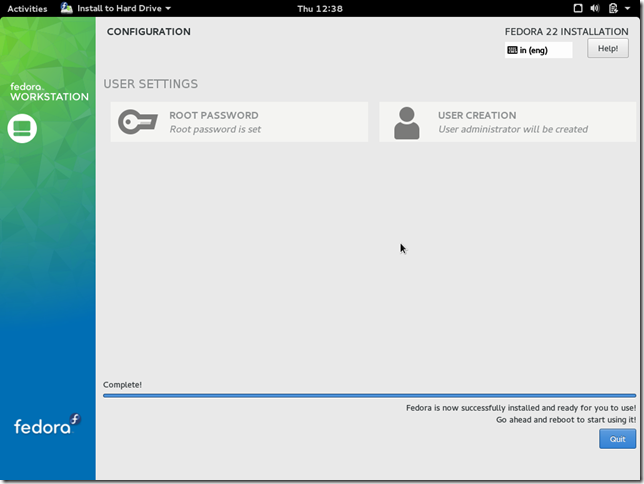
After the above steps, please be patient as the fedora installation continues. When the installation completes Fedora will show a screen similar to one shown below.

17

Now you are ready for using Fedora. Good Luck!!!!!!!!!!!!!!

Tuesday 4 August 2015

PowerShell Commands – Get-ChildItem - 1


[Note: This article is with respect to Powershell 5.0.10240.16384]

Let us look into the powershell command ‘Get-ChildItem’. This command is used to list the items under a parent item.

Get-ChildItem

The basic form of this command is ‘Get-ChildItem’ without any options. Then it will list the “directories” and “files” in the current directory.

For example if run from the location “C:\Program Files”, it will list the directories and files in “C:\Program Files”

Get-ChildItem –Path <path as string>

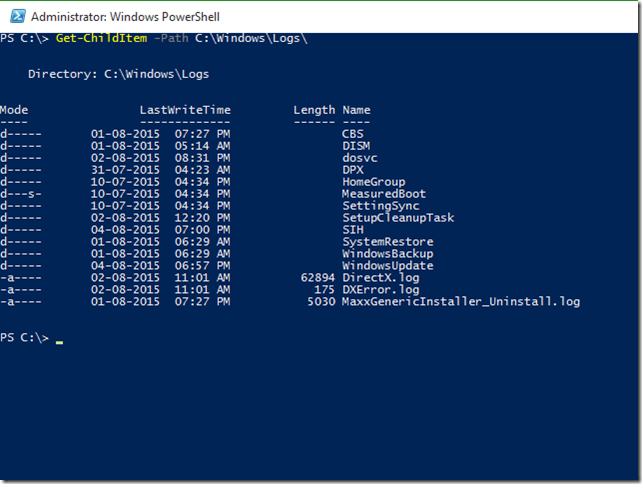
This form of the command accepts a “path of the parent” whose child items it will display. For example see the below screen which depicts the working of this command. Here the value of “Path” attribute is “C:\Windows\Log”.

1

    You can put the value of “Path” attribute in single quotes as shown below. This is used if the path  value is having space in it.

2

Also you can avoid specifying “-Path” completely. See the example below

3

If there is no sub-items in the parent directory there will be no result. Please see the example below. Here the directory doesn’t have any content

4

Get-ChildItem –Path <path as string> –Directory

This form of the command will only retrieve the directories in the given path.

Get-ChildItem –Path <path as string> –File

This form of the command will only retrieve the files in the given path. You can’t use the switch attributes “-Directory” and “-Files” simultaneously

{They are called switch attributes because they act like switches. Specifying them will alter the switch the behaviour. They don’t take any values}

Get-ChildItem -Path <path as string> –Recurse

This form of the command will retrieve the files and subdirectories in the directory recursively. That is powershell will travel through all the subdirectories recursively and print the output.

5

Get-ChildItem -Path <path as string> –Recurse –Depth <integer greater than or equal to zero>

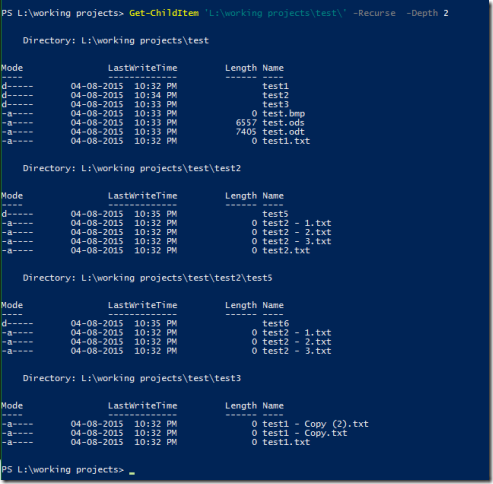
This form of the command will retrieve the files and subdirectories in the directory recursively up to the value specified in depth. The items which resides up to the depth will be printed.

If the  value  of  “–Depth” is zero it is same as the command ‘Get-ChildItem -Path <path as string> ‘.

See the below image. The directory “test6” is not visible in the output, since we set the depth to 2.

6

Get-ChildItem -Path <path as string> –Name

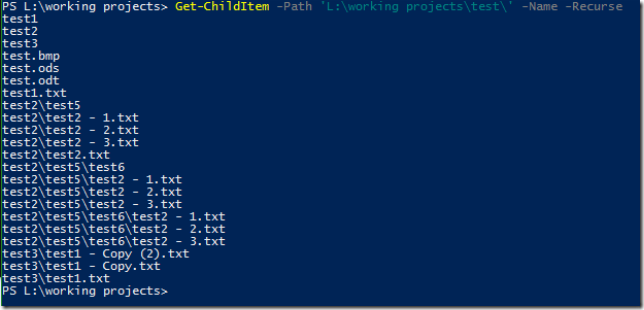
This form of the command will retrieve the files and subdirectories in the directory, but list only there name in the output.

7


Get-ChildItem -Path <path as string> –Exclude <Pattern as string>

This form of the command will retrieve only files and subdirectories that doesn’t match the pattern specified as the value of “–Exclude” option. Compare the below image with the above one. In the below image I have excluded items using the pattern “test2*”.

8


Get-ChildItem -Path <path as string> –Include<Pattern as string>

This form of the command will retrieve only files and subdirectories that match the pattern specified as the value of “–Include” option. Compare the below image with the one for “Get-ChildItem -Path <path as string> –Name”. In the below image I have included only items that match the pattern “test2*”.

9


Get-ChildItem –Path <path as string> –Hidden

This form of the command will only retrieve the hidden items in the given path.

There is also one more method to get the hidden files. Use the command form “Get-ChildItem –Path <path as string> –Force

Get-ChildItem –Path <path as string> –ReadOnly

This form of the command will only retrieve the read-only items in the given path.

Get-ChildItem –Path <path as string> –System

This form of the command will only retrieve the system items in the given path.

Monday 3 August 2015

Enabling Guest Account in Windows 10


By default the "Guest" account is disabled in Windows 10. To enable the same please follow the below steps

First of all click/touch on the "Start Menu" icon or press the Windows key in the keyboard. Start typing "Computer Management". Now click on the "Computer Management" item in the search result. See the image below


 This will open a window as shown below.


Expand the item named "" by clicking on the arrow on the left side of the item. Now select the sub item "Users". The middle pane will list all the users as shown below. As you can see the "Guest" account will have a black downward arrow. This shows the account is disabled.


 Double clicking the "Guest" item will bring a window similar to the one shown below. Untick the check box labeled "Account is disabled". Click "Apply" and then click "OK".


 Now as you can see the "Guest" account is enabled. Be sure to use a complex password for all user accounts.