Thursday, 13 February 2014

Ubuntu Server Setting IP Address by Editing “Interfaces” File


First login to Ubuntu server. Ubuntu server stores the configuration of network interfaces in the file “/etc/networks/interfaces”. To view the content of the file use the command “cat /etc/networks/interfaces”. So let see and example file in the below picture.

Here as can be seen there are two interfaces. The one with the name “lo” is the loopback interface. The other with the name “eth0” is the real interface connected to this machine. Here it is set to “DHCP” as shown by the line “iface eth0 inet dhcp”.
Now let us check the IP obtained by the machine. For this we have to use the command “ifconfig”. The ip as shown by the command is depicted in the picture below.

Now let us edit the file “/etc/networks/interfaces” to set the IP address to static. We will set the IP address to “192.168.56.105”. Here we assume the network interface is taken as “eth0”. For this you have to add the following lines as shown in the picture below:
[Use the command “sudo vi /etc/networks/interfaces” to edit the file]
auto eth0
iface eth0 inet static
address 192.168.56.105
netmask 255.255.255.0
gateway 192.168.56.1

After this save the file. (Hope you are familiar with vi editor).  Now to have the settings take effect you need to restart the service named “networking”. For this use the command “sudo service networking restart”. After that let us check the ip again using the “ifconfig” command”". See the picture below:

Now the IP has changed. Now let us ping to “google.com” and see the result. [I have Internet access from this system. Otherwise this ping won’t work. You can ping to your domain computers if yours is internal network]

My God no ping. I had set the network interface with IP, so what is the problem. Oh! I forget to set dns entries. OK let us add the same to the file “/etc/networks/interfaces”. For this you have to add the line “dns-nameservers <ip1> <ip2>”. Normally two ips for dns that is why. You can any number of ips separated by spaces.

Now restart the “networking” service again. Let us check the content of “/etc/resolv.conf” file by using the command “cat /etc/resolv.conf”.

You can see the dns server entries are now in this file. Don’t edit this file directly as it is generated dynamically on every reboot.
Now let us again ping to ”google.com”.

Got the ping. Now everything is working fine.

Installing Kubuntu in Virtualbox

As I have mentioned in my other posts describing the Installation of Ubuntu in Virtualbox, first create a VM for installing Kubuntu. Then add the “iso” file the CD Drive for the system. Start the VM.
It will bring the first screen of Kubuntu as shown below

Select the option “Start Kubuntu” (which will be selected by default) and press Enter to continue. The below screen shows the loading of Kubuntu.

As shown below after loading Kubuntu, it will directly take you to the Welcome screen. There you have the option to wither try the live CD or Install Kubuntu. Click on “Install Kubuntu”.

The next screen will be the “Prepare” screen. Here Kubuntu will check whether the minimum disk space is available as well as whether Internet is available. Also you have the choice to select the installation of third-party software as well as downloading updates. Here we haven’t selected any of this option.

The next screen is “Disk Setup” where you will setup the partitions. Here if you select “Manual”, you will be shown screen for creating partitions manually. We have selected “Guided – use entire disk” option. So everything will be done automatically by Kubuntu. After doing that click on “Install Now”.

On clicking the “Install Now” button in the above screen, Kubuntu starts creating partitions which will be shown in the same screen as a progress bar at the bottom. This is shown in the picture below.

After creating partitions it will move to the next screen named “Timezone”. Here you can set the time zone. You can either select the same from combo box or by clicking the map. After that click on “Continue”. Kubuntu will be copying the files to the Hard disk in the background at the same time.

The next screen is the “Keyboard” screen. Select the appropriate keyboard here and click on “Continue”

Next is the “User Info” screen. Enter the name, username, password and computer name in this screen. Also set the options like whether you want to “log in automatically” or “require password to log in” as well as to “Encrypt the home folder or not”. After that click on “Continue”.

This will take you to the last screen. Now you will waiting for the installation to complete.

As you can see below the installation has completed and now it is asking for a restart. Click on the “Restart Now” button.

Vow, after restarting you will be taken to the nice, beautiful login screen of Kubuntu. Just enter the password and login.

Now Kubuntu is loading the necessary services. After that it will take you to the desktop.

The beautiful Kubuntu desktop. I love this desktop. So cute.

Tuesday, 14 January 2014

Editing Software Sources in Ubuntu through GUI


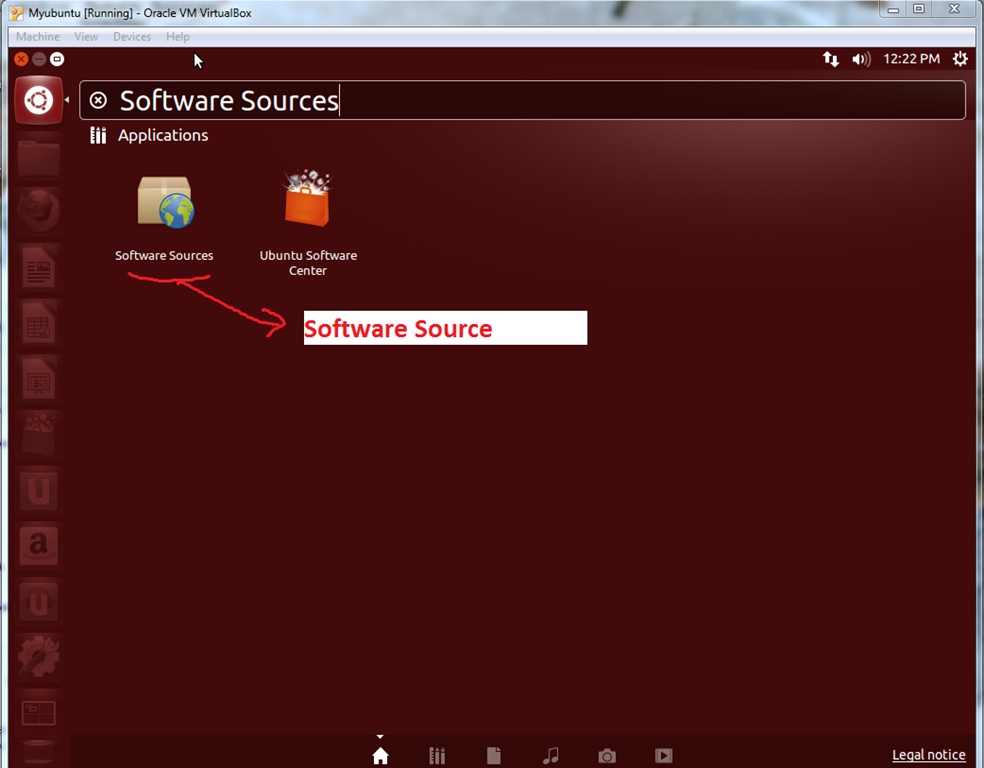
For this first we will go to the Dash Home and type the word “Software Sources” in the search box as shown below. This will list the software. Just click on it.

As shown below this will bring a Dialog Window. It has got several tabs. They are “Ubuntu Software”, “Other Software”, “Updates”, “Authentication” and “Additional Drivers” in that order. Let us check the first tab “Ubuntu Software”. Here you have the options to determine what all needed to be downloaded by ticking the options. Also you can select which server you need to use to download.

For changing the server, you need to be provide the password. You need to be a sudo user.

The next tab is “Other Software”. Here you can add the extra repositories you want to download from.

Now comes the “Updates” tab. Here you can choose what type of updates you want to install. Also the frequency of checking for updates can be set. You can also set how to notify you about updates.

Authentication tab helps you add or remove repository key files. Key files are needed for checking the authenticity of repositories.

The last tab is “Additional Drivers”. It will show if any of your hardwire has hot some additional drivers.

After doing the changes as desired, just click the “Close” button. If you want to change any settings you can click on the “Revert” button.

Monday, 6 January 2014

Enabling Developer Option in Google Nexus 7

In some cases you may want to enable features like “USB debugging” etc… For this you have enable the “Developer Option” in the tablet. Let us see how we can enable the same in Google Nexus 7 (It may be the same for all Android devices from 4.3.2)
First as usual tap the “Apps” button from Home screen

Now tap the “Settings” app

In the “Settings” screen tap the “About Tablet” item

In the “About Tablet” screen tap “Build Number” 5 times


No go back to the “Settings” screen. you will be able to see the “Developer Option” as shown below. Once enable this item will remain enabled on your tablet

Friday, 3 January 2014

Changing USB connection option in Google Nexus 7


Method 1
Drag down from the top left corner of the home screen


Tap the item “Connected as media device” in the appeared screen


Method 2
Click the “App” icon in the Home Screen as shown below

In the appeared screen tap the “Settings” icon

In the “Settings” screen tap on the “Storage” item

In the “Storage” screen tap on top right as shown below

In the appeared menu tap on “USB computer connection”

In the appeared “USB computer connection” screen select the desired option by tapping the check box.

Monday, 9 December 2013

Finding Ubuntu and Kernel Version and other details


Finding kernel details
You can use the “uname” command to find the kernel details in Ubuntu. The command has got various options which is described below
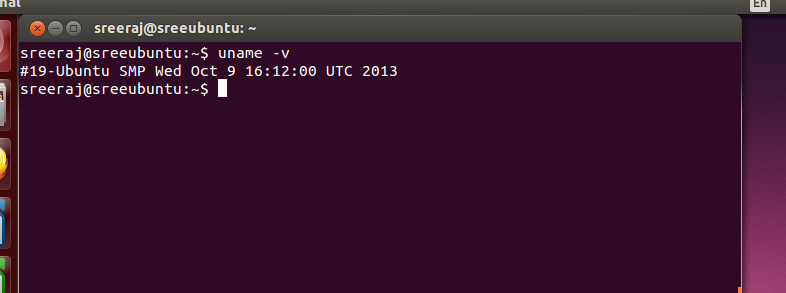
uname –v
This will show the kernel-version. When executed in Ubuntu 13.10 the result is as follows

uname –r
This command helps one to find the kernel release version. Please see the result of the same in Ubuntu 13.10 below

uname –s
This command helps one to list the kernel name.

uname –n
This command helps one to list the node name i.e the machine name or name you have given to your system.

uname –m, uname –p and uname –i
These variants help one to find the machine hardware name, the processor type and the hardware platform type.

Now if you want to see all these information at once you can use the following variant of the command
uname –a


Finding Ubuntu version details
Using the command “lsb_release” one can find some information about the Ubuntu version. Let us go through different variants of the command
lsb_release –r
This variant will help you to get the Ubuntu release version

lsb_release –i
This command will show the distribution ID of the Ubuntu release

lsb_release –d
Helps to get the description attached with the distribution

lsb_release –c
This command helps to find the codename assigned to the release

Now if you want to see all these information at once you can use the following variant of the command
lsb_release –a


Thank you all………….

Debian Deep Dive — Filesystem Hierarchy Standard

// System Administration · Debian Linux · Foundation The Linux Filesystem Hierarchy A thorough tour of the standard an...