Showing posts with label Windows 2012 Server Core. Show all posts

Tuesday, 30 April 2013

Some PowerShell Commands


Restarting Computer

Use the following command to restart the local computer

Restart-Computer

Shutdown Computer

Use the following command to restart the local computer

Stop-Computer

Renaming Computer

Use the following command to restart the local computer

Rename-Computer -NewName <name_in_string>

You need to restart the computer after renaming. If you want powershell to do it use the “-Restart” option as shown below

Rename-Computer -NewName <name_in_string> -Restart

Saturday, 23 March 2013

Windows Server 2012 Server Core–Playing with Network Card using PowerShell Part 2

Setting DNS server First find the InterfaceAlias or InterfaceIndex using the “Get-NetIPInterface” of the desired interface. Now use the following command to set the DNS server IP address
Set-DNSClientServerAddress –InterfaceIndex <InterfaceIndex as UInt32> -ServerAddresses <Comma separated list of IP Address as String>
                                                                 or
Set-DNSClientServerAddress -InterfaceAlias <InterfaceAlias as String> -ServerAddresses <Comma separated list of IP Address as String>
Before Setting DNS
  After Setting DNS
Removing DNS server First find the InterfaceAlias or InterfaceIndex using the “Get-NetIPInterface” of the desired interface. Now use the following command to reset the DNS server IP address
Set-DnsClientServerAddress –InterfaceIndex <InterfaceIndex as UInt32> -ResetServerAddresses
                                       or
Set-DnsClientServerAddress -InterfaceAlias <InterfaceAlias as String> –ResetServerAddresses
After resetting DNS
Removing IP Address First find the InterfaceAlias or InterfaceIndex using the “Get-NetIPInterface” of the desired interface. Now use the following command to remove just the IP address from the interface
Remove-NetIPAddress –InterfaceIndex <InterfaceIndex as UInt32>
                                 or
Remove-NetIPAddress -InterfaceAlias <InterfaceAlias as String>
 If you want to remove the IPAddress without confirmation just use the option “-Confirm:$false” at the end of above command, of course without quotes. Now if you want to remove IPAddress and default gateway then use the following command. Use “-Confirm:$false” part only if you don't want questions for confirmation.
Remove-NetIPAddress –InterfaceIndex <InterfaceIndex as UInt32> -IPAddress <IPAddress as String> -DefaultGateway <DefaultGateway as String> [-Confirm:$false]
                                                                       or
Remove-NetIPAddress -InterfaceAlias <InterfaceAlias as String> -IPAddress <IPAddress as String> -DefaultGateway <DefaultGateway as String> [-Confirm:$false]
 Viewing DNS cache Use the following command to view the DNS cache
Get-DNSClientCache
 Clearing DNS Cache Use the following command to clear the DNS Cache
Clear-DNSClientCache


Thursday, 21 March 2013

Windows Server 2012 Server Core–Playing with Network Card using PowerShell Part 1

Finding the InterfaceIndex or InterfaceAlias of the network adapters in the system
Get-NetIPInterface
This will list all the Network cards with their InterfaceIndex, Interface lias, AddressFamily, NlMtu in Bytes, InterfaceMetric, DHCP status, ConnectionState and PolicyStore in that order.
To view more details about a particular network card use the following command
Get-NetIPInterface –InterfaceAlias <InterfaceAlias as String>                              or Get-NetIPInterface –InterfaceIndex <InterfaceIndex as UInt32>


Another command that you can use for this purpose is the following one
Get-NetIPConfiguration
Issuing this will command will give you the details of the IP Network Interfaces as shown below


If you want to get the details of a particular interface use the following command
Get-NetIPConfiguration –InterfaceAlias <InterfaceAlias as String>
                       or
Get-NetIPConfiguration –InterfaceIndex <InterfaceIndex as UInt32>
[Note: You can use any of these commands to find the InterfaceAlias or InterfaceIndex for the commands below and for commands in Part 2 of this post]
To view the status and properties of the network adapter
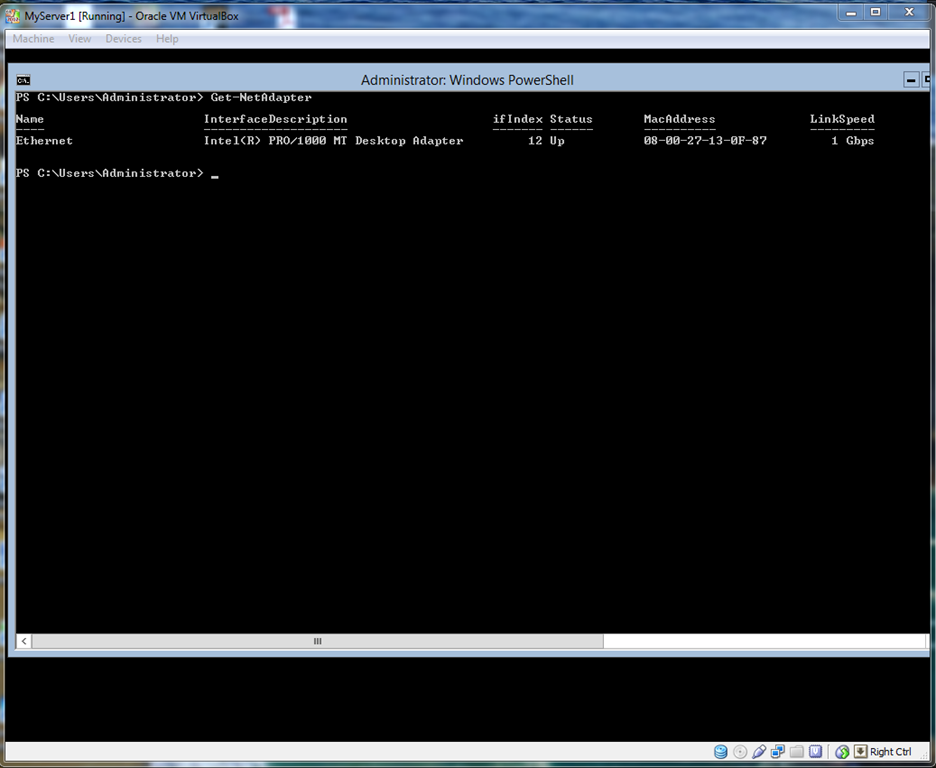
Get-NetAdapter
This will list the Name, InterfaceDescriptuion, InterfaceIndex, Status, MAC Address and Speed of all the visible network adapters in the system.
If you want to view the status of the hidden adapters also, use the following command
Get-NetAdapter –IncludeHidden
To disable a network adapter First find the InterfaceAlias using the “Get-NetIPInterface” command or InterfaceDescription using “Get-NetAdapter” of the desired interface. Now use the following command
Disable-NetAdapter -Name <InterfaceAlias>
                                              or
Disable-NetAdapter -InterfaceDescription < InterfaceDescription>
To disable a network adapter without asking for confirmation, use the following command
Disable-NetAdapter -Name <InterfaceAlias> -Confirm:$false
                          or
Disable-NetAdapter -InterfaceDescription < InterfaceDescription> -Confirm:$false
To enable a network adapter First find the InterfaceAlias using the “Get-NetIPInterface” command or InterfaceDescription using “Get-NetAdapter” of the desired interface. Now use the following command
Enable-NetAdapter -Name <InterfaceAlias>
                           or
Enable-NetAdapter -InterfaceDescription < InterfaceDescription>
To disable IPV6 in a network adapter First find the InterfaceAlias using the “Get-NetIPInterface” command or InterfaceDescription using “Get-NetAdapter” of the desired interface. Now use the following command
Set-NetAdapterBinding -Name <InterfaceAlias> -ComponentID ms_tcpip6 -Enabled $false
                                            or
Set-NetAdapterBinding -InterfaceDescription < InterfaceDescription> -ComponentID ms_tcpip6 -Enabled $false
Before Disabling IPv6
  After Disabling IPv6
Setting IPv4 address to a network card First find the InterfaceAlias or InterfaceIndex using the “Get-NetIPInterface” of the desired interface. Now to set the IP address, Subnet mask and default gateway for the desired network card please use any of the following command.
New-NetIPAddress –InterfaceIndex <InterfaceIndex as UInt32> –IPAddress <IPAddress as String> –PrefixLength < PrefixLength as Byte> –DefaultGateway < DefaultGateway as String>
                                                        or
New-NetIPAddress –InterfaceAlias <InterfaceAlias as String> –IPAddress <IPAddress as String> –PrefixLength < PrefixLength as Byte> –DefaultGateway < DefaultGateway as String>


Monday, 11 March 2013

GUIs available in Windows 2012 Server Core

 
  • Notepad – notepad.exe

  • Task Manager – taskmgr.exe or LaunchTM.exe

  • Registry Editor – regedit.exe

  • System Information – msinfo32.exe

  • Command Prompt – cmd.exe

  • Windows Installer – msiexec.exe

  • iSCSI Initiator Properties – iscsicpl.exe

  • ODBC Data Source Administrator – odbcad32.exe

  • Regional setting – int.cpl

  • DateTime Settings – timedate.cpl

  • Pen and Touch – TabletPC.cpl

Roles available with Windows 2012 Server Core

With Server Core the following server roles are available
  • Active Directory

  • Active Directory Lightweight Directory Services

  • Active directory Certificate Services

  • BITS Server

  • Branch Cache

  • DHCP Servers

  • DNS Server

  • File Services

  • Hyper V

  • IIS

  • iSCSI

  • Load Balancing

  • MPIO

  • Printing Services

  • qWave

  • Streaming Media Services

  • Telnet

  • Unix Migration

Wednesday, 27 February 2013

Windows Server 2012 – Server Core installation

Let us go through the step by step procedure for installing the Server Core variant of Windows Server 2012.
Boot the system using the DVD containing Windows Server 2012. The booting screen will appear as show below
Boot Screen while booting from Windows Server 2012 DVD

The screen below shows the first setup screen. It is asking for Language, Time and currency format and Keyboard. Select the desired value in each field and click on Next.
First Screen of Setup Window

The second screen of Windows Setup appears as shown below. It bears an “Install now” button. Click on it to start the installation of the server.
Second Screen of Setup Window

The next screen that appears is the one for entering the product key. You cannot proceed further without entering the product key. Please enter the key and click on next button.
Screen asking for Product Key

The next screen as shown below will ask for the OS you want to install. By default the Server Core variant will be selected. Click on Next to continue
OS selection window

Accept the license terms by checking the check box “I accept the license terms” in the appeared screen and click on Next
License Terms Screen

Select the desired type of installation on the next screen. We will select “Custom…” here, since we are installing on a fresh hard disk. By default “Upgrade….” will be selected. Clicking on installation type will take you to the next screen
Installation type selection screen

On this screen the setup wizard will ask you about the location were it should install Windows. Select the desired disk and click Next. To format or partition a disk, click on the link “Drive options (advanced)”.
Disk Selection Window

Now the installation procedure has started. The screen will show the progress of the installtion
Installation Progress Screen

After the installation the system will reboot and the first time login window will appear as shown below. This screen would ask you set a password. On clicking the “OK” button the screen for creating the password will appear
First Login Window

After setting the password the system will login and the screen as shown below will appear. Since this is Server Core installation there will be no GUI, only a command prompt window will be there.
The Desktop for Server Core

Debian Deep Dive — Filesystem Hierarchy Standard

// System Administration · Debian Linux · Foundation The Linux Filesystem Hierarchy A thorough tour of the standard an...