Monday 23 September 2013

Splash Image for Grub in Ubuntu


Let us see how we can set a background image for GRUB as well as set the colours for the entries properly.
First login to Ubuntu. Then edit the file “/etc/grub.d/05_debian_theme” as shown below. Add the highlighted lines to the file as shown below at the exact position. After editing save and close the file.

The highlighted entries above are used to set the normal color as well as highlighted colors for the text in the grub menu. The first one “color_normal” will set the normal text color. Please don’t change the value “black” after the slash. {This black is treated as transparency}
The “black” before the slash can be changed as you desire so that the text is more clear with background image. The second one is “color_highlight”. Here you can change both the colors, those before and after the slash as you wish.
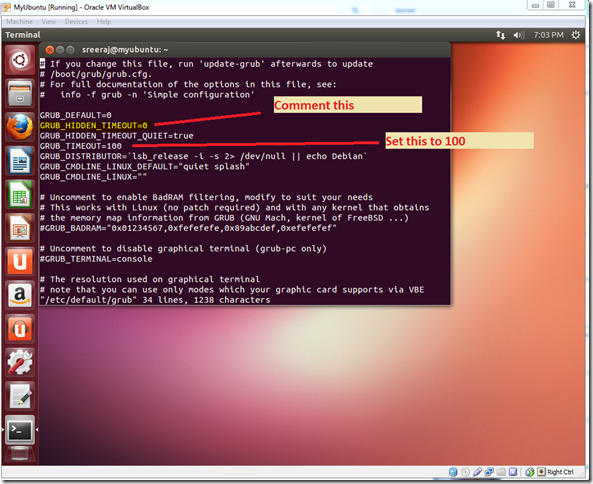
Now update the file “/etc/default/grub” as shown below. Add the highlighted entry into the file. After editing save and close the file

The entry “GRUB_BACKGROUND” holds the path to the image file, which should appear as the background of GRUB. The path can be any location where the image resides.
Now run the command “update-grub” as root in the terminal. See the image below for knowing what happens.

Now reboot the system and you will be able to see the GRUB as below. As you can see the background image is the one I specified. I have set the “normal_color” values to “black/black”. So all the text are black. The value for “color_highlight” is “black/green”. So you can the highlighted background is green and the text is black.

Sunday 22 September 2013

Making Grub menu displayed even if only Ubuntu is installed


To have this change first login to Ubuntu. Then open the terminal and issue the following command
sudo vi /etc/default/grub
Then comment the entryGRUB_HIDDEN_TIMEOUT=0” as shown below. And let us set the value of “GRUB_TIMEOUT” to 100 (meaning 100 seconds).

After that run the following command
sudo update-grub
Now restart the system. you can see something like the one shown below


One of the other method is to simply Press and Hold down the right SHIFT key while the system is booting.

Wednesday 4 September 2013

Ubuntu 13.04 desktop


Lets us go through ubuntu desktop. In the picture below the elements on the desktop has been marked.


So there is a Dash (something similar to Start Orb in Windows), there is a menubar (which will serve as the menubar for all applications), a Launcher (something similar to taskbar icons in Windows) and a system menu in the menubar. Whatever application you take, the icons of network and sound and the time and system menu will always be there in the menubar.
Let us see what the Dash holds. See the picture below.


To open the Dash you have to click the Ubuntu Dash icon in the Launcher. This will be the first icon in the Launcher. Clicking on the icon will bring a search window where you can type the desired name. The bottom part of the window has got a number of icons, which are called lenses, which help you to focus the search to a particular type.
See the picture below to see what happens as soon as you start typing in the search box in the Dash home.


Yes it started showing the result.


Now see the different lenses in the Dash window. The different once are Dash Home, Application Lens, File Lens, Music Lens, Photo Lens and Video Lens.
Now let us take a look at the launcher. Right click any icon in the Launcher. It will bring a small menu which will help you to work with the icon


To remove an icon from the launcher, as shown in the above picture, just right click the icon and click on the menu item “Unlock from Launcher”. As shown the picture below, the item will be removed from the launcher.


As soon as you launch any application it’s icon will be displayed in the launcher. So if you want to lock some running application to the launcher, please do as shown below.


Just right click on the icon in the launcher and click on the menu item “Lock to Launcher”. The item will be locked to the launcher as shown below.


Now let us see what is in the System menu in the menubar.


As you can see in the picture, it will help the user to “Log Out”, “Shutdown”, “Lock” and switch between user. Not only that it helps to access the “System Settings”. It also helps to know about your computer and also to access the help files for ubuntu.
Hope this helps in familiarizing the ubuntu desktop. This is just a brief. We will go deeply later.

Monday 2 September 2013

Installing Ubuntu Inside Virtualbox VM


Let us install the Ubuntu 13.04 OS inside the already created VM. For this first we need to edit the setting of the VM.


As you can see in the picture, right click the VM and click on the “Settings” menu item. This will bring the following dialog box.


In the dialog box, select “Storage”. In the “Storage” page click on the CD symbol. Here it is show with the label “Empty” since no CD/DVD is assigned.


After selecting the CD/DVD icon click on the rightmost CD icon as shown. This will bring a menu and click on the item “Choose a virtual CD/DVD disk file”. After selecting the desired iso file the screen will be as follows.


As we have assigned the ubuntu iso file as virtual CD drive, now click on “OK” button. Now click on the “Start” button as shown in the image below


This will start the VM as shown below


Now the VM starts booting from the CD


After the initial loading is complete it will show the setup wizard as shown below


 Since we are going to install Ubuntu here, from the above picture click on the “Install Ubuntu” button. Of course, select the language as desired by you. This will take you to the next screen as shown below


Select the checkbox “Download updates while installing”, if you want to download the updates and also you have a live internet connection. Similarly, select the checkbox “Install this third-party software” if you want to do so.. Here we will keep it as default and will click on ”Continue” button.


 This screen will ask you about the installation type you want. We will select the first one that is “Erase disk and install Ubuntu”. Now click on the “Install Now” button.


This screen will ask you to select the desired time zone. Click on the correct location in the map and it will show the place name. Here we will select “Kolkata”, since am from India. Now click on “Continue” button.


Here select the desired Keyboard layout. Here “English(US)” is selected. There is also provision to detect your keyboard layout. For this click on the button “Detect Keyboard Layout”. Now click on the “Continue” button.


Now this is the final dialog box asking information. Here you have to enter your  name, the computer’s name, a username, and a password. Also you can select “log in automatically” and “Encrypt my home folder”. After entering/selecting desired values click on the “Continue” button.


The installation has started here.


Now the installation has finished. Click on the “Restart Now” button to restart the system. Just note that the system will eject the CD/DVD Drive before restarting. You have to press enter to continue the restarting process when the CD/DVD drive is ejected


The system has restarted. The login screen for the user. Once you login you can see the screen below, the Ubuntu desktop.


Wow!!!!!!!!!! Our Ubuntu.

Creating a VM for Ubuntu in Virtualbox


Let us see how to create a VM in virtualbox for installing Ubuntu


First click on the “New” icon in the VirtualBox Manager. This will bring the “Create Virtual Machine” wizard. Now type the name of the VM in the “Name” field. If the name contains a word “Ubuntu” it will automatically select the “Type” as “Linux” and “Version” as “Ubuntu”. Otherwise select the same for both the fields. After that click on the “Next” button.

This will take you to the next page to specify “Memory Size”. The default will be 512MB. Here I have selected 1024 MB (1 GB). Please select the desired memory size (Don’t select the full memory as your system needs memory to run) and click next.

This will take you to the Virtual Hard Disk creation page. If you don’t want to add a Virtual Hard disk now, please select the option “Do not add a virtual machine”. If you have already created a Virtual Hard disk and wanted to add that, please select the option “Use an existing virtual hard drive file”. If you want to create a virtual hard disk now please select the option “Create a virtual hard drive now” (Which I have selected here) and click on next.

This will take you to the “Create Virtual Hard Drive” wizard. In the first page select the type of the virtual hard drive. The “VMDK” type is the one used by Vmware. Here I have selected “VDI” as the type of the file. Now click on the “Next” button.

In the next page of the wizard select the form of allocation in virtual hard disk. You can have a “Dynamically allocated” disk or a “Fixed size” disk. For the “Dynamically allocated” disk you will specify the total size of the disk at the start, but the disk will be created only with the minimum size just required to create the disk. It will grow dynamically (up to the size you specified) as more contents will be loaded to the disk. This type of disk will be created very quickly. But for “Fixed size” disk the disk will be created with total size. This type of disk will take to create some time. Here we have selected “Fixed Size”. Now click on “Next” button

In this page browse the location where this virtual hard disk should be saved. Also specify the size of the disk. After that click on “Create” button.

In this screen as you can see the disk creation has started..

In this screen the VM has been created. Now it is ready for installation of the OS. That will be explained in the next Post.